Before we get started, please be careful! Some of these tips can be dangerous. Don’t guess! If you aren’t sure what something does, give your IT Support a call!
Most of these performance tips will impact battery life if you have a laptop. Laptops often wind back performance to extend battery life. Generally speaking, the better the performance, the shorter the battery life.
Windows 10 Start Up Performance
Shake Your Boot(y) Time!
Windows 10 introduced a new trick that means “Shut Down” is no longer a shut down. It’s more like the hibernate option from older versions of Windows.
The default Windows 10 Shut Down state allows the PC to boot more quickly because it hasn’t really shut down. This is handy if you want a quick start up but, as mentioned in the article “Troubleshooting 101: Have you tried turning it off and back on again?“, sometimes you need to shut everything down and start fresh to make Windows behave.
So this tip depends on whether you are seeking speed or reliability:
- Speed: leave Shut Down as default and enjoy quick start times but remember you have to Restart every now and again to avoid gremlins!
TIP: You can also hold down the “Shift” key when you click Shut Down and that will force a full shut down. - Reliability: set the default Shut Down option to actually shut down which should make for a more stable Windows 10 experience but cost you a little extra time when starting up. Asus have easy to follow instructions on their How to disable Fast startup in Windows 10 OS FAQ.
TIP: You can also quickly disable hibernate completely by opening a command prompt as admin and using the command “powercfg -h off“
Start Up Applications
The next biggest start up problem are applications that load themselves on start up to make them open faster when you use them.
There are a lot of system processes that start automatically and I won’t go into those because if you start playing with system processes you can really make a mess!
But there are usually plenty of regular applications that, like the Windows Fast Boot option, you can choose whether you want the delay when you start the computer or when you start the app.
There are three places where you can see and change which applications are loading when you boot Windows:
- Startup (Settings)
- The Task Manager
- Startup Folders
Settings > Apps > Startup
Click on the Settings option in the Start Menu, Choose Apps and then select “Startup” from the menu on the left.
You will see a list of applications that can be configured to launch when you start Windows. Applications that are currently starting themselves automatically will be “On” while some applications might already be “Off”.
TIP: Unless you know exactly what the applications is for, don’t turn it off!
However, if you recognise the app and know it isn’t critical, then you can turn it off to decrease the time it takes your computer to start up at the cost of it taking a few seconds longer to start the application.
For example, I don’t use Cortana so I have turned it off. I very rarely use Skype anymore so that is off and if I ever need to use it, I’m happy to wait a few extra seconds for it to start.
Disabling unused, or infrequently used, applications may also slightly improve overall performance because they aren’t running in the background constantly.
The Task Manager
TIP: Unless you know what you are doing, probably best to avoid this method and stick to the Startup Apps way. But if you do want to see more …
Press CONTROL+SHIFT+ESCAPE to launch the Task Manager and, if the window doesn’t have any tabs or options and only shows the running applications, click on the “More Details” button at the bottom-left of the window.
More Details will show you a lot of what is going on with your PC and you really don’t want to mess around with things unless you know what you are doing!
Click on the “Start-up” tab and you will see a list of applications that are able to launch when you start Windows.
This should be the same list of applications you see in the Startup Settings in the example above only now the apps are Enabled or Disabled instead of On or Off.
Same caveats apply as with the Startup Settings!
Startup Folders
Startup Folders are another place applications can hide a shortcut to launch themselves so if you have something starting up and you can’t find it using either of the methods above, it could be using the Startup Folder.
There are two Startup Folders – a common one that will apply to all users and a personal one that only affects your login.
Windows 10 has sort of hidden the Startup Folders, or at least made them harder to find. Older versions of Windows let you see them in the Start Menu. To get to the Startup Folders in Windows 10:
- Press the Windows key + R
The “Windows Key” is usually located between the Control and ALT keys and has the Windows logo on it. - For the “All Users” Startup Folder type: Shell:common startup
For the “Current User” Startup Folder type: Shell:startup - Click “OK”
It is normal for both folders to be empty because well behaved applications won’t use that method anymore in favour of the Startup Apps Settings.
Windows 10 Overall Performance
This one is tricky because everyone’s PC is different but here are a couple of generic things you can do to choose speed over anything else:
- Performance Options: Hidden in the old Control Panel, not the Windows 10 Settings, is the Performance Options panel. You can access it by pressing the Windows key and typing “Performance” (don’t worry if you can’t see anywhere to type, just start typing and Windows will search for you!)
One of the search results should be something like “Adjust the appearance and performance of Windows” and if you click on that, the Performance Options Panel will open. If you don’t mind Windows not looking so pretty, choose the option “Adjust for best performance“
Chrome Users: You need to use a “Custom” setting because Chrome seems to rely on the option “Smooth edges of screen fonts”. Make sure that option has a tick if your Chrome fonts look funny. - Power & Energy Settings: This one only really applies to laptops because desktop PCs should default to “high performance” – but it’s something to check.
- Go to Settings > System > Power & sleep
- Click on “Additional power settings”
- Under the “Choose or customise a power plan” options make sure “High Performance” is selected.
TIP: For a laptop, you can choose this plan only when on AC power and chose a more balanced plan for when on battery.
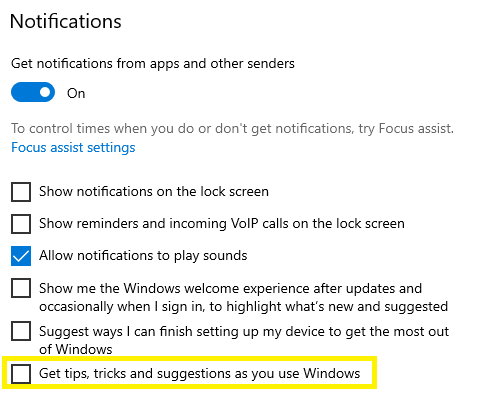
- Turn Off Windows Tips & Tricks: Windows, by default, watches what you are doing and will sometimes offer up tips or tricks. (Anyone remember Clippy in Office?) This can slow your PC down a little so if you don’t want them you can disable them.
- Go to Settings > System > Notifications & actions
- Remove the tick from “Get tips, tricks and suggestions as you use Windows”

- Disable Transparency Effects: Similar to changing the Performance Options to go for speed over looks, there is another setting in the personalisation options that makes the Start Menu and Taskbar look prettier at the cost of performance.
- Go to Settings > Personalisation > Colours
- Find the option for “Transparency effects” and turn it off
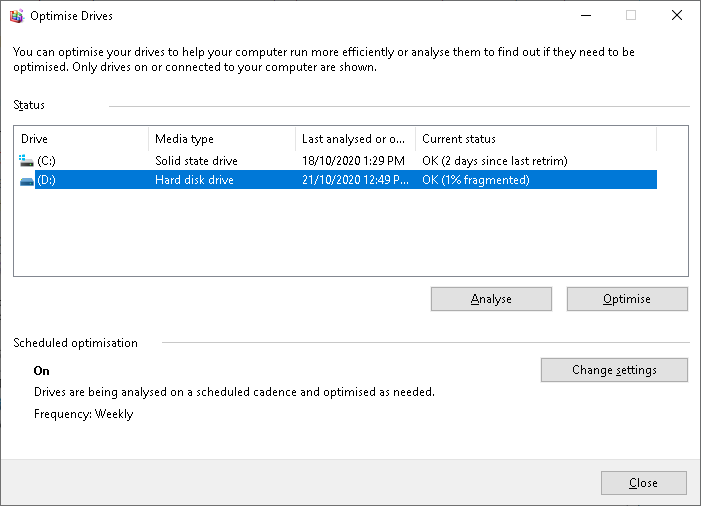
- Defragment your Hard Drive: Warning: Only do this if you know you have a mechanical Hard Disk Drive (HDD) and not a Solid State Drive (SSD). Defraging an SSD shortens the SSD life span!
- Press the Windows key and type “defrag” (don’t worry if you can’t see anywhere to type, just start typing and Windows will search for you!)
- Click on the result for “Defragment and Optimise Drives” and you should get this window:

- Only select a “Hard disk drive” and click on the Analyse button.
Windows will tell you how much fragmentation there is and whether it recommends defragmenting the disk.
Click the Optimise button if recommended and then go for a walk! It will probably take a long time!


