


The Microsoft Teams Video Conferencing features have improved since mid-2019 and are now an excellent alternative to others on the market and, if you have seen my post on Video Conferencing, you’ll know that we strongly advise our customers not to use Zoom.
The Microsoft Teams interface for meetings, especially video conferencing, was updated in August, 2020 and this article is based on Windows 10 using Microsoft Teams Version 1.3.00.19173 with the “new meeting experience” that came with the August update.
To check which version of Microsoft Teams you are using click on your profile picture at the top-right of the window and select “About > Version”. The version number will be displayed in the window below the search bar.
To enable the “new meeting experience”, click on your profile picture at the top-right of the window and select “Settings” and place a tick in the check box for “Turn on new meeting experience (New meetings and calls will open in separate windows. Requires restarting Teams.)”
Microsoft Teams: Internal Team Meetings
Video Team meetings are a great way to stay in touch especially while we are all stuck in lock-down and video enabled meetings are a way to get a little bit of human connection!
For a group video conference with internal staff, this is best done through the “Chat” section of Microsoft Teams.
Create Your Chat Group
You need a chat group with the members of the team you want to meet with. Group chats are primarily used to send text messages to other members of the team. Once they are set up though, they can also be used to quickly and easily launch a team meeting using audio, video or screen sharing.
 Click on the Chat button on the left hand navigation menu in the Microsoft Teams application
- Select an existing chat and skip to “Starting a Video Chat” below or click on the “New Chat” button to the left of the search bar to set up your group.
- Enter the names of the people that you want to add to the group chat. Teams will search for users as you type and when you have a match you can click on the result or press enter to add them. You can add multiple users this way.
- Click on the down arrow on the right-hand side of the screen, just above the list of names of people you have added, and the Group Name: box will appears. You can name your group here – for example “All Staff”.
- Send a new message to create the group and welcome everyone.
The group chat you just created will now appear in the Recent tab of your chat messages. You can also pin that chat so that it stays at the top of the list by clicking on the “…” that appears when you hover your mouse over the chat and selecting “Pin”.
Starting a Video Chat with the Team
Starting a video chat between all members of a group chat is really quick and easy.
- Click on the group chat that you want to meet with
 Click on the “Video Call” button that appears near the top-right of the chat window.
That’s it. All group members will receive a call from you and as they join the meeting, you will see them appear in the video conference.
The other options available are to start the meeting with audio only (the Audio Call button) or start the meeting by sharing just your screen (“Screen sharing” button). Starting in screen sharing mode will also pop up a question to share audio as well which you can accept or reject.
Microsoft Teams: External Video Conferencing
The internal team meetings via chat are quick and easy – but you can only chat with one external person at a time and they require Microsoft Teams installed (and some back-end settings enabled) to allow it – but if you have this set up then you can quickly and easily start a video or audio call with that external person too.
But what if you want multiple external people or a face-to-face meeting with someone that doesn’t have Microsoft Teams? You can now create meetings on the fly or schedule them for later with up to 250* people, internal or external to your organisation.
- The number of participants depends on your licence. Free users can have up to 50, Microsoft 365 subscriptions up to 250 and Enterprise Users (E3 and above) can host a presentation for up to 10,000 users!
Meet Now
![]() Near the top-right of the Teams tab you will now see a button with a picture of a video camera and the word “Meet” with a drop down arrow.
Near the top-right of the Teams tab you will now see a button with a picture of a video camera and the word “Meet” with a drop down arrow.
To start an instant meeting:
- Click on the word “Meet” (not the drop-down arrow)
With the latest version of Microsoft Teams and the “new experience” enabled, a new window will open so you can now keep using Teams to access files or chat with others while the meeting is in progress.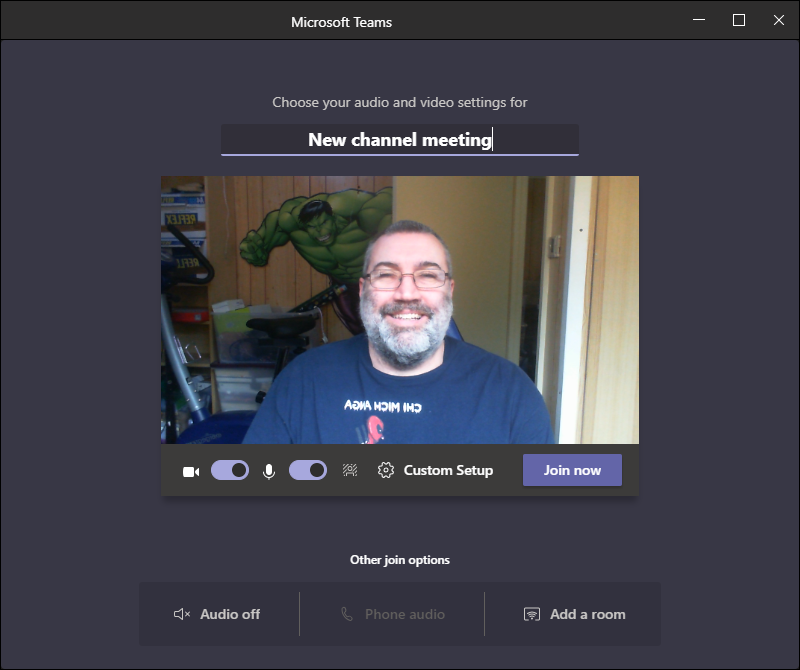
- Here you can change the name of the meeting from the default, in this example, “New channel meeting” as well as tweaking some other meeting settings. You shouldn’t need to do this unless you have multiple devices.
Click on “Join now” to start the meeting.
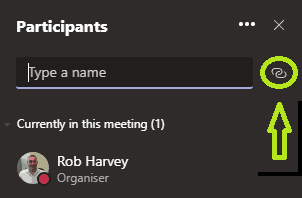
- After a brief “Connecting” window you will find yourself in a meeting with no other members. To invite an external user you need to send them an invitation link. Currently, you cannot seem to do this via the “Type a name” text box. Instead, click on the link button (See the image below).
- Open your email client and compose an email to the person or people you want to invite to the meeting and paste the contents of the clipboard into the body of the email.
The email should include something like this:
Join Microsoft Teams Meeting
Learn more about Teams
The recipient just has to click on the link in the email and they should see a page like this:
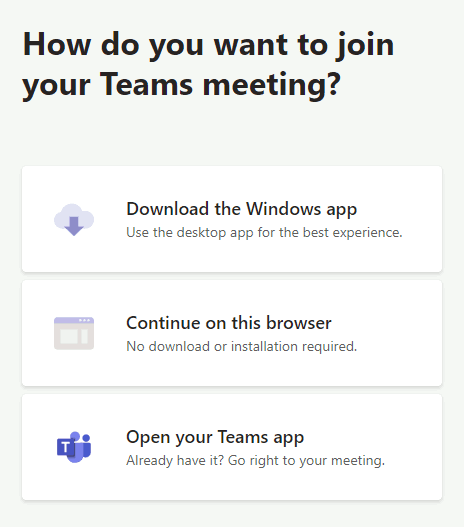
They can join the meeting using just their browser by choosing the second option or they can download the Teams Application if they don’t already have it – for phones and tablets, this seems to be a requirement as their default browser doesn’t seem to be supported at the moment.
If they already have Teams installed they can choose the third option however in my testing, that seemed to happen automatically taking me straight to the “Join Meeting” page.
The Lobby
You can share that link with as many people as you like and as people join the meeting they are added to “The Lobby”. This prevents uninvited people that get a hold of the link from joining your meeting. As the meeting organiser you should get a notification there is someone waiting in the lobby and their name will appear with a cross or a tick.
Click the cross to reject them from the meeting or click the tick to allow them into the meeting.
If you can’t see the current meeting participants or lobby, press the Show Participants ![]() button. Press it again to hide the participants list.
button. Press it again to hide the participants list.
Scheduling a Meeting
![]() If you click the “Schedule a meeting” option from the Meet drop-down, you will get a window that allows to define all of the meeting requirements such as:
If you click the “Schedule a meeting” option from the Meet drop-down, you will get a window that allows to define all of the meeting requirements such as:
- the meeting name
- required and optional participants
- the time, date and duration
- whether or not it repeats
- the Team and Channel it is related to
- the location and
- a description or additional information
Scheduled meetings will appear in your Outlook calendar if the Teams integration is enabled (which I believe it is by default) and the invitation your guest(s) get can also be added to their calendar client although so far I have only tested with Google Calendar and Outlook.
Setting up the Meeting
Most of the options are reasonably straightforward. The Meeting Name will be used as the subject line for the email that goes out to all participants listed as required or optional members. By default only the “required attendees” box is shown but clicking on the ” + Optional” button will add another box to add guests that are optional.
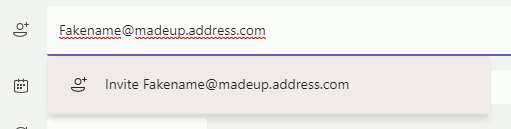
Note: When adding external email addresses you cannot just press enter – when you complete the email address and option will appear below the address to “Invite (the email you just entered)”.
Click that invite to add the user to the meeting!
Date, Time and Repeating options work just like setting up an invite in Outlook. Check that your time zone is correct. The time zone appears at the top-left of the meeting page, just above the meeting title.
You can set the time and date and then use the drop-down menu in the repeat section to choose one of the pre-configured options or choose “Custom” to create your own repeating pattern.
The next options is the Team and Channel the meeting is related to. Unless you have a specific requirement to change that, you can leave the default.
The last two options are the location and description. Location seems a little redundant to me as we mostly use this for online meetings but if you were hosting a physical meeting somewhere but inviting other to attend online it would make sense to set a location.
Click on the “Send” button at the top-right of the screen to send the invitations and add the appointment to your calendar.
When the meeting begins, if you have Teams running, a pop-up will appear to let you know the meeting has begun. If the meeting was added to your Outlook calendar you will also get the usual Outlook reminder that a meeting is about to begin.
Conclusion
So there you have it, a pretty rough guide to using Teams for video conferencing within your organisation or external. It can be great for having a face-t0-face meeting with a customer and it’s really simple to use it within your team for quick video meetings – which, right now given the situation Victorians find themselves in, is probably quite good for our own mental health and well-being. It’s nice to see my colleagues every morning, even if it isn’t in person!