

Shared Mailbox Search
Have you wondered why you can’t find anything using the search function in Outlook on a shared mailbox search when you know the emails are there.
Shared mailbox are added automatically when permissions are assigned in the Microsoft 365 Admin portal. To fix the issue you need to add the Shared mailbox manually. Once you finish setting up the Shared Mailbox it will just replace the one that had been automatically added.
How to fix it
Below are the instructions on how you can setup Outlook to add the shared amilbox manually so that you can search it.
1 In the Outlook application Click on File -> Account Settings -> Account Settings
2 Click on New
3 Enter the email address for the Shared Mailbox and then click Connect
4 When prompted for the password Click on Sign in with another account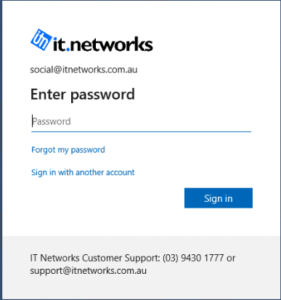
5 Enter your email and password to Sign in
6 Verify your identity when prompted (if you have 2FA setup)
7 It will prompt for the password to the Shared Mailbox, just click Sign in with account again
8 Click on your account that is Signed in already when prompted to Pick an account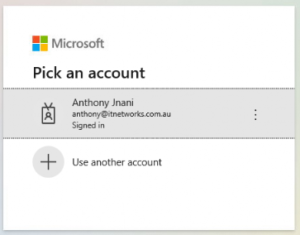
9 Click Done once. The Account is successfully added.
10 Click Close then close down your outlook and open it up again. You should now be able to do a search on the Shared Mailbox